Weebly Website Builder Guide
Introduction
Weebly is an easy to use, intuitive website builder for a wide variety of website types. With its ease of use, flexibility, and variety, it makes it a great builder for any type of site. There are four different plans for Weebly.
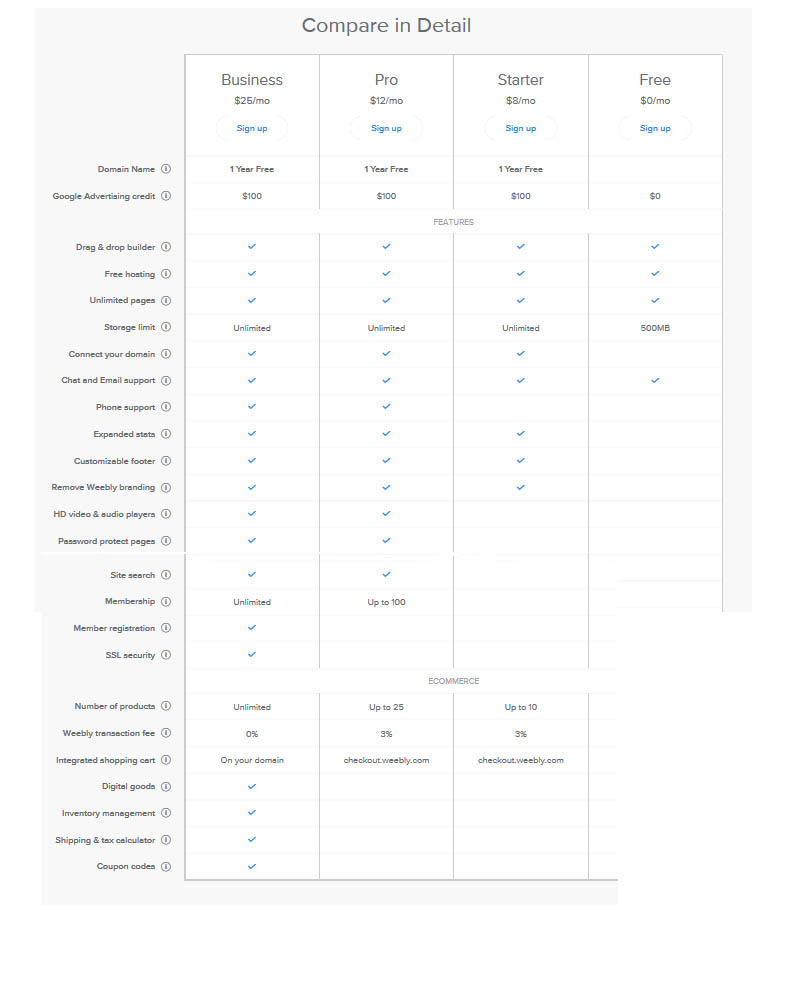
Figure 1: Weebly plans
The options are Free, Starter ($8 per month), Pro ($12 per month), and Business ($25 per month). All plans include the website builder, free hosting, unlimited pages, some storage (the free plan only has 500MB), and chat/email support. All paid plans include unlimited storage, a free domain for one year, $100 of Google advertising credit, “connect your domain” capabilities, expanded stats, a customisable footer, ability to remove Weebly branding, and eCommerce capabilities. The Pro plan lets you also get phone support for your site, allows HD video and audio players, has password protected pages, allows you to implement a site search, and lets you grant membership capabilities. It also increases the number of products you can have in your eCommerce store. The Business plan allows you an unlimited number of members, unlimited number of products in your store, SSL security, does not require any transaction fee, and gives you your own integrated shopping cart. It also gives you digital goods, inventory management, shipping & tax calculator, and coupon codes. So basically, if you want a simple website, free or starter would be sufficient. If you want to create a web store, you’d probably require a business plan. And for professional websites between those extremes, either pro or starter would be a good choice.
Once you’ve made a decision, it’s time to create your website!
Getting Started
To begin creating a website, go to weebly.com and choose “Get Started”. You can choose to sign up through Facebook, Google +, or email address. Next, it will ask you to choose a theme. The categories you can choose from are: Featured, Business, Online Stores, Personal, Events, Blog, and Portfolio. Each has its own theme options. Once you’ve found one you like, hover over it and select “Choose” in the bottom right corner.
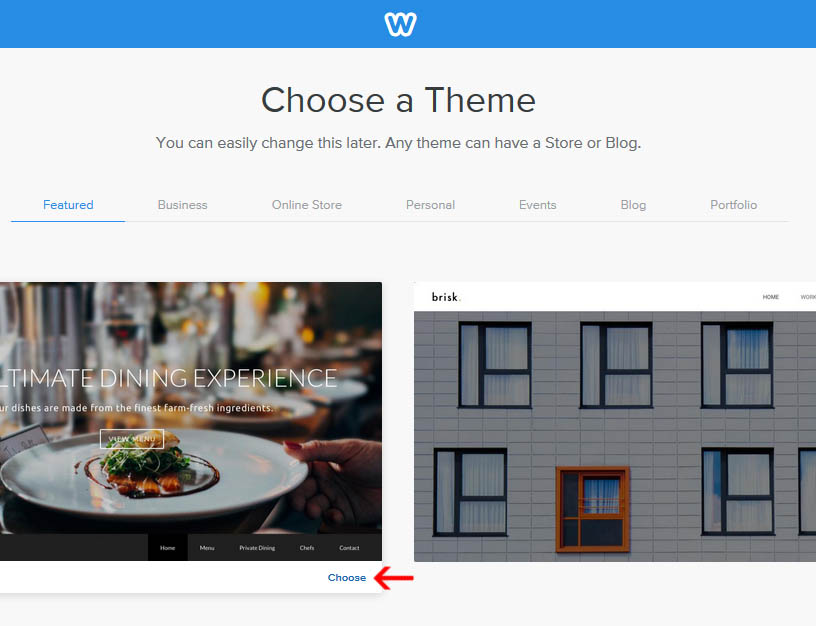
Figure 2: Choose a Theme
Once you’ve chosen a theme, the first thing it will ask you to do is choose a domain for your website. You can use a Weebly subdomain, register a new domain, or use a domain you already own. When you type in the address you want, it will tell you if it’s already taken or not. If you choose to register a new domain or use a domain you own, it will take you to choose a paid plan. A subdomain will appear as MyPageName.weebly.com. Once you’ve decided on a subdomain, you are taken to the editor for your page. From here, you can see a variety of options for your page:
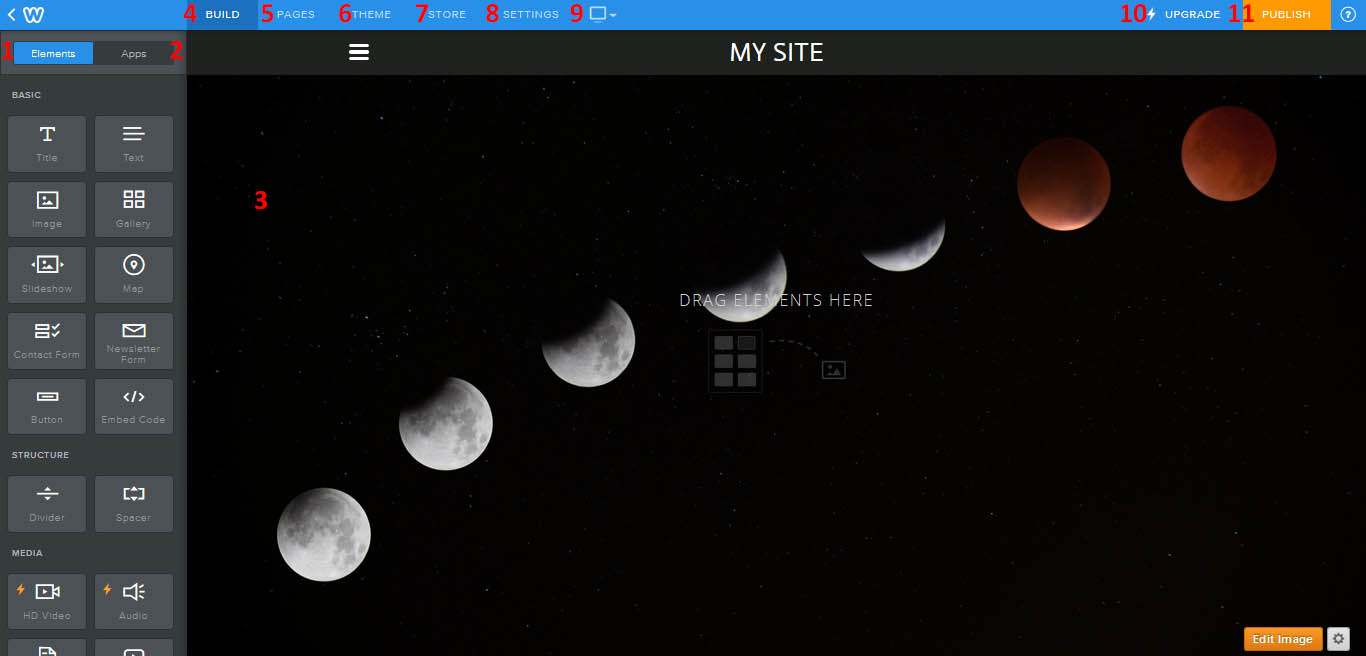
Figure 3: Page Editor
- Drag and drop these onto your page.
- Find a listing of different apps you can add to your page.
- A view of your page. Drag and drop things onto here to add them to your page, then click on the elements or apps to edit the.
- Brings up the elements and apps menu.
- View and add pages on your web site.
- Change the theme of your website.
- Lets you view and modify a store on your page.
- Settings for your page.
- Switch between desktop and mobile view.
- Upgrade your plan from free to paid.
- Publish the modified version of your web page.
Let’s cover each of these page modifications in turn.
Elements
To add any element to your page, just drag and drop it onto the view of your site. For each element, once placed, you can hover over the element to copy it (left hand arrow), move it (middle bar) or delete it (right hand x). Once you click on each element, you will be given a variety of different options depending on what the element is.
Title

Figure 4: Title editing menu
- Text field.
- Bold
- Italicize
- Underline
- Increase font size.
- Decrease font size.
- Change font color.
- Insert a link (choose from: URL, standard page on your site, product page on your site, blog post on your site, phone, file, or email). If the link is to one of your web pages, you can use the search bar to find the page of interest. You can also choose whether or not the link opens in a new window. If you want the link to have a specific text, write that text, highlight it, and then choose to add a link. Your text should turn red, meaning that it is now a link.
- Remove formatting.
Text
This menu looks almost identical to the title menu, but with the additional capabilities of adding bulleted or numbered lists.
Image
Once you click on the image element, you will be prompted to add your image. You can drag a photo to the area, upload a photo from your computer, search for images (where you will be presented with professional photos that you can purchase, or free photos), favourite images (you can favourite any free or professional images), or an image URL.
Once you’ve added an image, the image menu will come up. The first option you have is the “edit image” menu. From here, you can add an image to your image element area, crop the image, rotate the image, change the opacity, fade the image (set it to fade in a certain direction to a certain extent), or apply effects (colour it black and white or antique, and give it Polaroid or burnt edges).
The second menu option is to replace the image, which takes you back to the upload page. Next, you can choose to make the image a link. Then, you can choose to align it. You can choose the spacing of the image in the box from the top, bottom, left, and right margins. You can give the image element a caption. There are also advanced options to choose the border thickness, border colour, and alt text of the image.
Gallery
The first thing this element asks you to do is upload images to the gallery. Once you’ve added the images, you can choose how to display them from the Gallery menu. The first option is to add more images at any time you choose. You can choose the number of columns in your gallery. You can choose the top and bottom spacing. You can add a caption, and if it is shown upon hovering over the image. You can also, with advanced options, choose the images spacing, border, and image ratio (square or rectangle).
Slideshow
When you drag your slideshow element onto your page, it will ask you what type of style you desire. You can choose simple, thumbnails on bottom, top, or side, numbers on bottom, or double thumbnails. Once you choose one, it will ask you to choose your images. When you’ve uploaded the, it will show bubbles above each one that let you turn the image into a link, add a caption, or delete the image. You can also reorder the images by dragging them around. Once you’ve chosen your images and choose save, it will let you “play” your slideshow to view how visitors to your site will see the slideshow. You can also view your slideshow options. You can add or edit photos at any time. You can choose a transition style (slide, mosaic, slice, or fold). You can decide the navigation style (thumbnails, double thumbnails, numbers, or none) and location (top, bottom, left, or right). You can choose the speed through which the images cycle (3-9 seconds per image). You can choose the spacing from the top and bottom margins. You can choose if the caption appears on the top or bottom. Through advanced options, you can choose if autoplay is on (if the user does not need to click on the “play” button to start the slideshow), if controls are present, if you start at the first image or a random image, and the aspect ratio (4:3, 3:2, or 16:9).
Map
When you insert your map, you can click on it to get your “Map” options. The first thing it wants is for you to choose the address your map focuses around. You can choose a specific address, or a city. To view the updated map, click on the map element area. You can then change the zoom level, the map width and height, its alignment, and the margin spacing. In advanced location, you can set the map to focus on a specific latitude and longitude, instead of typing in an address. In advanced display, you can choose if there is a marker, if there is a scale, if there is an overview map, and how much control (if any) the user has over the map (pan and zoom capabilities)
Contact Form
The first option when you have inserted a contact form is to “view entries”. When you click this link, it will take you to a new window, where all form entries are compiled. If you choose “Form Options”, you can name the form, state who the form gets emailed to, decide if you provide a confirmation message or confirmation link, choose the spacing between the margins, and choose the button alignment and text. In addition, each segment of the form can be selected and modified, or deleted. The default fields are name (first and last), email, and comment. If you look to the left where the “elements” section had appeared, it will provide you with “form fields” options. You can insert a short text box, large text box, option buttons, dropdown box, checkboxes, file upload, name, email, address, or phone number. You drag to the location on the form where you want them to appear. Text boxes allow you to determine the field title, whether or not it is a required field, if you wish to include instructions, the spacing, and the width/height. Options buttons let you choose the name of the section and the option items. The option items can either be determined by the user, or there are a variety of preset options (gender, age, states, etc.). When you’ve inserted one of these “predetermined options”, you can still modify them. They simply function as a jumping off point. “Edit” will allow you to rearrange or delete different options. You can also determine this section’s spacing, instructions, and whether or not it is required. Dropdown box and checkboxes function the same way. File upload is only available with premium plans. Name, email, phone number, and address are just specialised versions of text boxes. In a free plan, you can have up to five field options. At the top, there is a title if you wish to introduce your contact form.
Newsletter Form
This works exactly the same as the contact form, but the only default segment is “email”.
Button
This allows you to add a button to your page. You can choose the button’s text, its style (and size), its positioning, if it links to something (and what that something is), and its spacing.
Embed Code
This allows you to add custom HTML to your page. Click on the area to edit the section. From here, you can also choose its positioning. You can use this to write your own code, or to paste in something that another person has provided you with.
Divider
This allows you to choose the margin spacing and width of a divider you’ve inserted.
Spacer
You can drag the bar at the bottom to increase the spacer’s size. This simply adds a blank space to your page. This is because elements added to your page are automatically added to the next available vertical space.
HD Video & Audio
To insert these components to your page, you must have a premium and above plan.
Document
This uses Scribd to display a document of your choice. You can upload a file, and then decide what height the box has. This box allows the user to zoom in and out, as well as download, share, and full screen the document.
YouTube
This allows you to add a YouTube video to your page. The settings ask you to insert the YouTube video URL, the positioning, the spacing from margins, and (under advanced) the size and YouTube video ID. The YouTube video will allow users to sign in, share, play, mute, turn on closed captioning, change video settings, move to watch the video on YouTube, and go full screen.
File
This allows you to add a file for webpage viewers to download. You can choose its positioning and the file name.
Product
When you add a product, it will ask you to search for products you have made, or create a new product. Creating a new product will take you to the “Store” menu, which we will discuss later.
Google AdSense
This helps you generate website revenue by showing ads targeted to your site content. The first step is to choose “Authorise”. This will ask you to log in to your Google account. It will ask you to choose the content language, country, time zone, account type (individual or business), name and address, contact email and phone, and email preferences about AdSense. You then submit your application for consideration for this service, and if you are approved you’ll receive an email. This is a great opportunity to generate extra revenue through your personal website, especially since Weebly doesn’t take a cut of it.
Search Box
This allows the user to search your site for specific content (similar to a site-specific Google search). This option is only available for Premium members.
Block Quote
For this, you get all of the same options you had when you inserted a title. The only difference is, when you add it, there is a red bar on the side and the text is greyed out to indicate a block quote.
Social Icons
Once added, you can manage which icons get displayed by choosing “Manage Icons”. Your options are Facebook, Twitter, Instagram, LinkedIn, Mail, Flickr, Pinterest, Google+, RSS, Vimeo, Yahoo!, YouTube, and dribble. For each one, if you select it you can enter a username, and decide whether or not it is shown. All those currently shown are in the “Active” section, and all those not shown are listed under “inactive”. You can also reorder the icons. Finally, on the main page, you can choose the alignment and spacing.
RSVP Form
This allows you to create an RSVP form for an event. It has the same options as the previous forms discussed. The default options are title, “can you make it”, number of additional guests, email, name, and submit button. However, as with the other forms, this is completely customisable.
Survey
This is another form with the same options. You can modify it any way you wish. The default options are: “how did you hear about this site?”, “what is your age?”, and “what is your household income?”.
Feed Reader
This lets you put in an RSS feed reader on your site. You can put in the URL of the RSS reader, then decide on the feed’s width, position, spacing, number of items, and amount of text for the story shown.
View More
This takes you the “Apps” page.
Apps
The two options are “App Centre” and “My Apps”. There is also a list of featured apps.
App Center
From here, you can either search for an app that has the keywords you’re interested in, or choose from one of the categories shown. Your choices are: boost traffic, spike sales, get social, and made by Weebly. At the bottom, you can choose from: All apps, eCommerce, communication, marketing, social, and site tools and features. And each of these main categories has several subcategories associated with it. You can sort each category by popular, highest rated, new, and free.
Each App has several options. First, it will display the app designer and ratings. It gives a short description of what the app does. Then, you can click on “Add” to put it on your page. Below the add button, it lists the price, the website of the app designer, and a “get help” link for the app. Next are images of the app in action, followed by a more in-depth “about” section, and then the reviews of the app by others.
Once you’ve chosen to add the app, it will ask you to connect it to your page. This will install it to your site. It will also tell you what things this app will access in order to function if you add it.
My Apps
From here, you can see all installed apps for this website. Next to each website is an ellipse. If you click on the ellipse, you can choose “get help”, “app listing page” (the page you viewed with all of the app’s information), or “remove app”. Above the ellipse, some apps will have a “manage” feature. This allows you to customise this app for your own personal use. In addition, if it is an app that gets added to your page, you will see it listed in elements under “Third Party”.
Page View
From here, you can edit the background image, or modify what your header looks like. These options appear in the very bottom right corner of your page. If you have a premium plan, you can also modify your footer here.
Edit Image
This allows you to change your background. “Change Image” allows you to select a background or upload your own. If you select a background provided by Weebly, you can choose from categories active, business, city, close-ups, creative, lifestyle, nature, and structures. Once selected, you can zoom, blur, darken, or filter your image (filters are lighten, vignette, gotham, or grayscale). You can additionally drag the image around the page to move which part of the image is centred on your page. When done, select “Save” or “Cancel” from the top right corner. Save lets you choose to save to all pages, only this page, or selected pages.
Header
Here, you can choose from tall, short, no header, landing page, splash, or title. If you click on the header itself, you can also turn it off, as well as change the text in the header, or switch it to a logo that you then are prompted to upload.
Pages
From here, you can view your current pages. If you drag them up or down, you reorder how they appear in the left-hand menu of your page. If you drag them left or right, you can create subpages. When you click on one of your pages, you can modify the page name (and whether or not its hidden from the navigation bar), the header type, the visibility (public, site password, or only for members/groups), and the SEO settings. SEO stands for search engine optimisation. You can modify the page title (for the browser headline), the page description (for the search engine results), the keywords, the footer code, and the header code. You can also choose to hide the page from search engines. Finally, you can choose to copy or delete the page (you cannot delete your home page).
If you choose the plus sign next to the word “Pages”, you can add a new page. Here, you can choose a standard page, a blog page, a store page, or an external page. External page will simply be a linked to page of the URL of your choice. You can choose whether this opens in the same tab or in a new tab.
Blog Page
If you create a blog page, you get a slightly different page type, with different “Elements” categorised under “Blog Sidebar”.
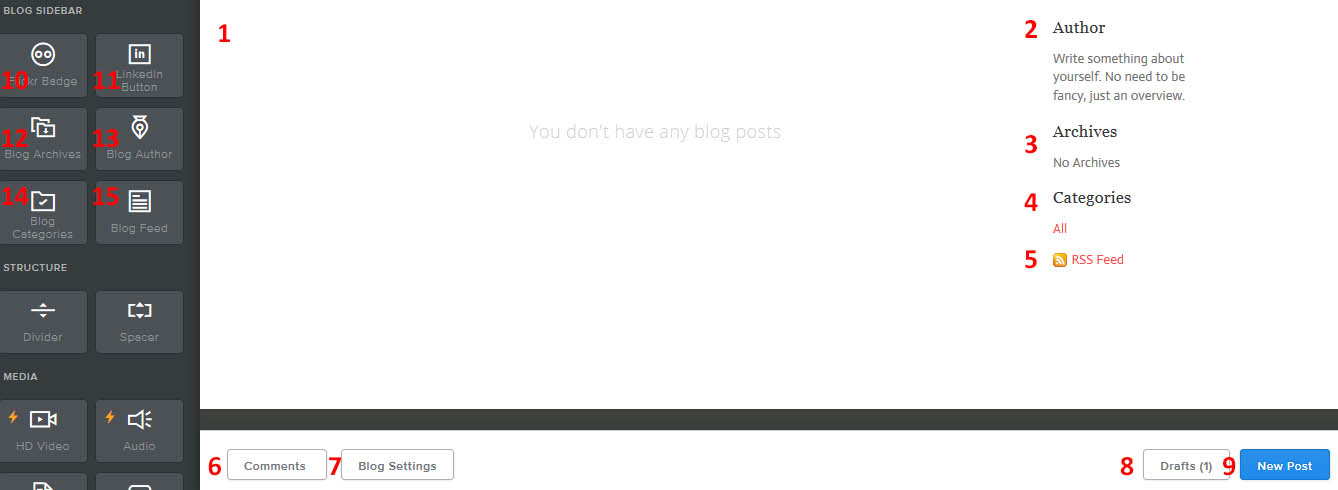
Figure 5: Blog Page Options
- Recent blog posts.
- Author information section.
- Archives of your previous posts.
- Categories of your posts, with links that show only posts in that category.
- RSS Feed for your blog.
- Manage comments on your page. You can view recent, pending, deleted, and spam categories. In addition, you can choose to approve, delete, or mark as spam any new comments (if they’re comments that require approval).
- Blog settings. From here, you can choose posts per page, if post share is on (for Facebook and/or Twitter), if the blog sidebar is on, and header/footer codes. You can also change comment settings. You can decide if the comment system is default, Disqus, or Facebook. You can decide if, by default, it is open, closed, or requires approval. You can choose to auto-close comments after a certain number of days from posting. You can decide if you show CAPTCHA to protect against spam, and whether it moderates for spam. And you can decide if you are emailed about new comments.
- View your most recent drafts. Click on them to view and edit them, and hover and select “x” to delete them.
- Create a new post.
- Add a Flickr badge to your site. You can choose the user source, the width and height, the positioning, the spacing, and (for advanced settings), the email association, border colour, number of photos, choose latest or random photos to display, choose the number of photos tagged, and the user ID.
- Add a LinkedIn button to your site. It provides the standard “view my profile on LinkedIn” button. You can choose the alignment, the spacing, the page it links to (under advanced), and which button style you prefer (1-6).
- Archives (the same as 3). You get the same font options for this area as you had for the “title” element.
- Author (the same as 2). You get the same font options as you had for the title element.
- Categories (the same as 4). This, too, gives you the same font options as above.
- RSS Feed (same as 5).
You can also add a “read more” break on any blog posts you have by selecting this item under “basic elements”. This our recent posts only show some of the post you’ve published, and then requires the reader to click a link in order to read the rest of the post.
New Post/Edit Post/Edit Draft
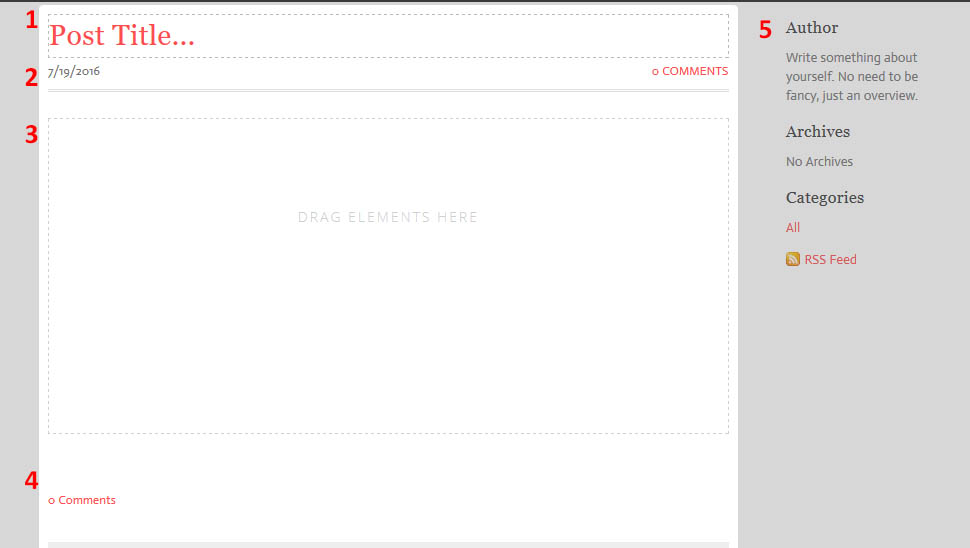
Figure 6: New Post Options
- Post title.
- If you click here, you’ll be shown a calendar to view and select a day.
- Here, you can drag any elements from the “elements” tab to your blog post. Even text must be added in this fashion. The elements are the same ones as you have for your page.
- If this post has any comments, you can view them here.
- The Blog sidebar that appears on every page that is associated with your blog section of the site.
Your Elements bar will also have a section at the bottom labeled “Post Options”. From here, you can choose when to publish (immediately or at a scheduled time), determine comments settings (open, closed, or require approval), add categories (either search or create a new one), view your “secret draft link”, and change the SEO settings for the post (title and description). To save a draft or post your new entry, choose “save” or “post” on the top right corner of the page.
Theme
This allows you to modify or change your theme.
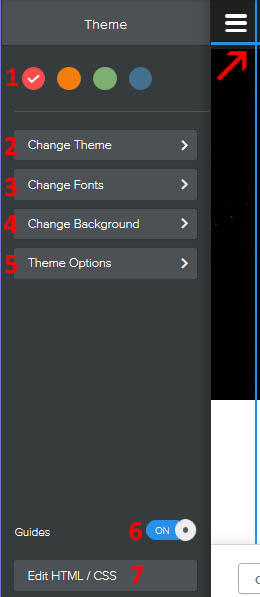
Figure 7: Theme Options
- Choose a new colour for your theme to focus around. The colours available are determined by the theme you’ve chosen.
- Choose a new theme. For each theme, you can preview it before you apply it to your page. You can also view recently used themes, and custom themes.
- From here, you can change what fonts are automatically associated with different elements of your theme. There will be defaults from the maker of the theme, but you can modify any of them. Just know that this changes it for every single one of these elements, and you can’t just change one title from another, for example. You can choose font, style (bold/italic), size, colour, if uppercase is on, and the spacing between letters. Some will also let you change the line height (spacing between lines of words), and some let you change how the item appears when the user hovers over it (mainly used for things that link to other pages). You can also reset to the default settings at any time. You can modify: site title, navigation menu, phone number, headline, sub headline, paragraph titles, paragraph text, links, buttons, block quotes, blog post titles, image captions, gallery captions, slideshow captions, and product elements.
- Change background of your page. This brings up the same background editing options we mentioned earlier.
- Theme options. These are things your theme lets you modify. For example, this one lets us turn on search boxes or collapse navigation.
- These turn on page guides (indicated by the arrow).
- This allows you to edit the HTML/CSS of the page. This is for people who know HTML and want to customise their page a bit further. It brings up an HTML editing screen with a view of how your site has changed below. It also allows you to export the changes, so you can choose “Custom” as a theme in the future.
Store
There are several components to the “Store” page. Note that the only true way to have a store on your page is by having a premium plan (it is the only way to add products).
Dashboard
From here, you can add a store page, add products, add store information, or change how you accept payments. You can also view the state of your current store with “View Store”. Adding a product requires you to have a premium plan. Store information and payment methods take you to the settings page.
Products
From here, you can import and export products, as well as add a product. Once added, you can search through them or categorise them.
Storefront
Here, you can select products and determine their categories. You can also determine the header type, and whether or not Twitter, Facebook, Pinterest, and Google+ icons are displayed. You can also change the SEO title and description under “Advanced Options”.
Categories
This lets you add a new category of product. For each category, you can choose a name, which products are in the category, the category image, and the display options.
Coupons
This lets you add a coupon deal to your site. This is only available to use with the “business” package.
Orders
When you’ve received an order in your store, it will be here. You can search them, determine to only view ones that are pending/refunded/shipped/returned/cancelled/sent, or you can choose to export your orders.
Settings
General
This lets you determine your currency, weight unit, store mode (add to cart or buy now), company name and contact information, return policy, shipping policy, and note to seller during checkout.
Checkout
This lets you determine how your shop accepts payments. The default is “Stripe”, which works instantly. It charges 2.9% + 30 cents per transaction, deposits in your account after 7 days, and Weebly takes a 3% cut. If you upgrade, you can use Square, Authorize.net, or PayPal. Square is also 2.9% plus 30 cents per transaction, but the funds go into your account in 1-2 business days. Authorize.Net requires an application, but only charges 2.4% plus 30 cents per transaction. It also has a setup fee. PayPal redirects to PayPal for checkout, and charges you 2.9% plus 30 cents per transaction.
Display
This lets you choose how many columns of products you have, and how many products are displayed per page. It also lets you choose the product and category image ratio.
Shipping
You need a business package to change the shipping options. You can choose to change the price by the location with this choice.
Taxes
You need a business plan to change the taxes options. You can choose to change the tax based on where the order is coming from.
Emails
You can choose to change emails for order confirmation, download confirmation, shipped email, refund email, or cancelled email. You can view the default options, and choose to send a test email to see how it will appear to the recipient. The only modifiable information is really the header and footer messages on the email.
Advanced
Here, you can add a Google Analytics tracking ID. You can also add a custom tracking code. The variables to add a custom tracking code are shown on the side of the “tracking code” box. You can add different codes to your cart page, payment page, and receipt page.
Settings
General
From here, you can change your site address, site title (that appears on the top of your pages), the SSL (only available with upgraded plans), the favicon (only available for upgraded plans), the password for certain pages on your site if you choose to make them private, and the navigation (if you group more pages than can fit on your bar with a “More” option). You can also choose to set up Facebook sharing, either for your profile or your organisation page. This will take you to Facebook to authorize Weebly to access your profile. Therefore, when you post something, you can choose to share it on your profile page as well. You can create a .zip archive of your site. You can enable “Simplechat” for real-time customer support for website users. You can change the date, time, time zone, and language format for your site. You can decide whether or not to notify users about cookies on your site. You can also un-publish your site.
SEO
Change the search engine optimisation of your page. You can change how the site description appears in the results, as well as the keywords for your page. You can also modify the footer code to add a Google Analytics tracking code, or the header to add meta tags. You can also decide to hide the site from search engine. You can also choose to add an old URL you used to have and have it redirect to one of your new pages if it 301 redirects.
Editors
This allows you to add other people and permit them to edit your website. You add an email invitation for whoever you wish to grant website permissions. The free plan can only add admins, which can change anything. Pro plans can add authors, who can only edit selected pages and settings, and “dashboard only”, which can view and manage stats, forms, and comments.
Members
This allows you to view and manage the members on your site (only available with the business plan). You can either add manually, or add through a CSV file. Members are permitted to view special pages on your site. You can also add groups, which are granted different access to different pages.
My Apps
This lets you view and manage current apps you have downloaded for this site.
Store
This brings you to the store settings page.
Blog
This takes you to the blog settings page.
Main Menu
Whenever you go to Weebly.com after making an account, you’ll see the main page.
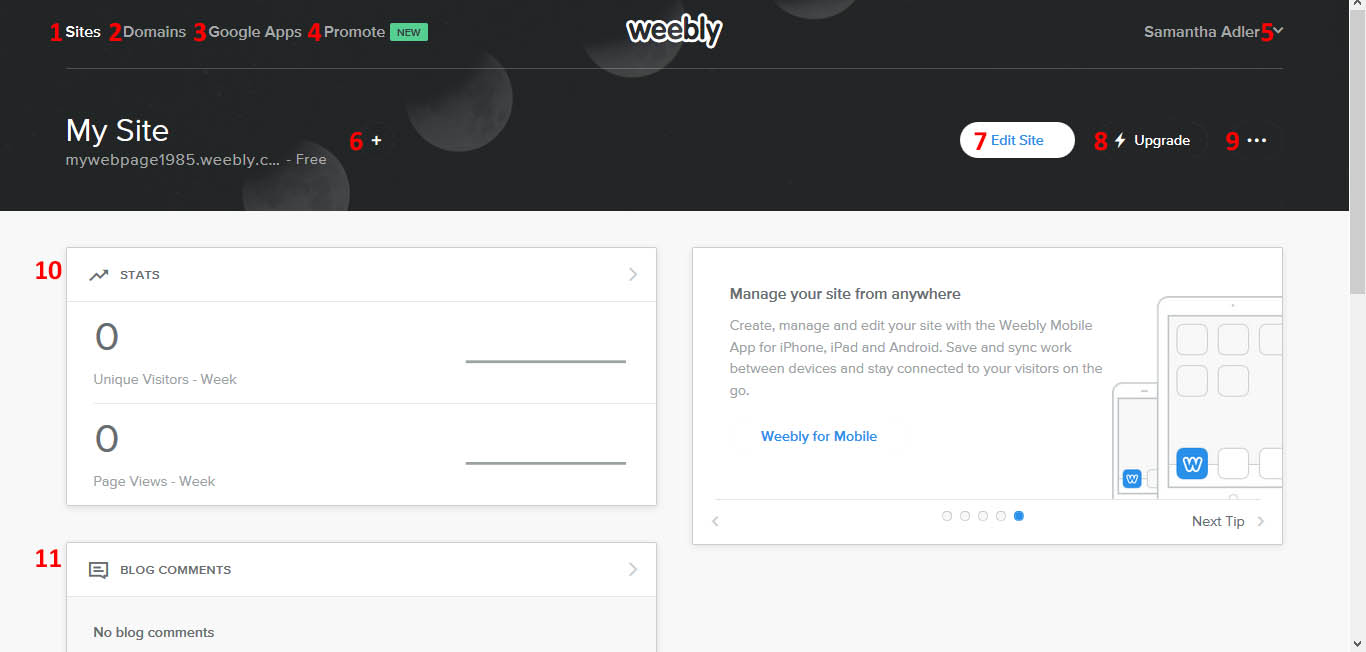
Figure 8: Weebly home page
- This takes you back to the Weebly dashboard.
- This lets you register or transfer a domain to your Weebly site (requires a paid plan).
- Google Apps. This gives you access to Google Apps for your site. From here, you can manage them. This is only possible with a registered domain. You are given a 15 day free trail of Google Apps whenever you choose.
- This is a tool that allows you to create emails to promote your blog. Once you’ve sent out the blog, it will also give you statistics on how well your campaign led to blog views. You can send two for free as a trial run before needing to upgrade your plan. We’ll go into detail about this below.
- From here, you can view your account information. You can connect Facebook or Google+. You can also edit your profile to change your name, email, or password. You can add a payment method, view “My Services” (which will give you information about Weebly services you’ve signed up for), view any external account associations, and view your order history of purchases made on Weebly. You can also permanently delete your Weebly account using the red text at the bottom of the account page.
- With +, we can switch between the different sites you have associated with this account, or add a new site.
- This takes you back to the editor page.
- Upgrade to a paid plan.
- Copy or delete your site.
- View how many visitors and page views you’ve had this week
- View recent comments on your blog posts.
Promote
From any of the pages, you can choose to compose a new email by clicking on “Compose Email”
Compose Email
First, it will ask you to choose what kind of email you want to send (general, commerce, newsletter, event, or blog summary). On the bottom, it also shows you any saved emails you have already created. Select continue.
Next, design your email. When you hover over each section, a gear will appear that lets you change features of that section. You can edit the background (choosing image, colour, or no background), the height, reorder the sections, add a new section, or delete the section. For each section, on the left hand side of the page you will see elements (build or design). Similar to elements, you can drag them onto the different sections to add them. Under “Build”, you can add title, text, image, gallery, embed code, logo, product, and blog. You can also add dividers, buttons, navigation, a map, social icons, or files. Under “Design”, you can change colours, fonts, email border, and decide whether or not there is a browser link. You can choose colour palette for the full email, the backdrop colour, and the colours of the primary and secondary buttons. You can choose different fonts for the paragraph title, paragraph text, links, primary buttons, secondary buttons, and image captions. You can also choose the email border (inside, outside, or none), the weight, and the colour. At the bottom of the right handed panel, you can undo, redo, clear all elements, or save template. When done, choose “Continue”.
Next, you will choose the email information. You will add a subject line (and can customise the preview text for the email), as well as add a sender profile. You can choose the email address (once verified), the sender name (name or company), the address, and advanced (phone, website, commercial registration, vat/tax ID, and additional information). This will appear in the footer of the email. Once you’ve decided on a sender profile, you can choose “Add”. You can decide which sender profile you want to use to send your email if you have multiple.
Next, add recipients. You can type new or existing contacts, or type a group name to add that group.
Finally, it will ask you to review and send the email. From here, you can modify the “from” profile, the subject line, and who it is to. It will also show you how the email will appear on desktop and mobile devices. Then, you can choose send now, send a test email, or schedule email to be sent (if you have a premium plan). If you choose to close the email before sending, you can save it as a draft, or discard it.
Insights
This gives you a seven day overview of number of emails sent, site visits, new contacts, and average email open rate.
Mailbox
This shows you emails you have sent. It also lets you view drafts and scheduled emails. For these, you can duplicate them, change the name, or delete.
Automated
This will allow you to add emails that will automatically be sent based on actions on your Weebly site. You can create a “thank you” email (for making a purchase), how was your experience, thanks for contacting us, we’ve missed you, welcome to new contacts, happy birthday, see what’s new, and double opt-in (to confirm their email addresses and that they wish to sign up for your mailing list).
Lead Capture
The goal is to create a form that will bring more viewership. You can do popup forms or smart bars, which both prompt the user to sign up for your mailing list. This option is only available with premium plans. Once you’ve chosen a form, you can customise it using the “edit form” selection. It lets you modify the title, text body, form components, and subscribe button. You can also edit content (whether or not to include text body and name areas), font options (of title, text, and button), colour options (of title, text, background, button, button text, and input border), and confirmation (message or link). Lastly, you can preview and publish your form. You can choose the name, group those who sign up via this method, and determine the form settings (when it appears, how often it displays, whether it disappears for members who have opted-in, the date duration of the form appearance, and the display preference). At the bottom, it will show you a preview of the form.
Groups
Here, you can search the different groups you’ve formed of various subscriber bases. It will tell you the group name, contacts, emails sent, open rate, and allow you to change the group name (with the ellipse). You can also choose to create a group or search through your current groups. You can import the group from a file, copy and paste emails, create from existing contacts, or (if you have a premium plan) create a smart group. Under groups, you can also view or add contacts. You can sync Weebly contacts, add an individual, copy and paste addresses, or import from a file.
Conclusions
Overall, Weebly is a great site for those who are just starting out and want to create something simple and aesthetically pleasing. It’s very intuitive, and does a good job of making design decisions for you. However, if you want a website with more customisation, then you’d be better off choosing a different builder option.
For additional tips and tricks for using Weebly efficiently, visit their blog at https://www.weebly.com/blog. If you need more assistance, you can also visit their help centre at https://hc.weebly.com/hc/en-us.
 Connect